Floating Floor Installation in Kansas City, MO
Our Floating Floor Installation service at Kansas City Flooring Company offers the perfect solution for homeowners seeking quality and convenience. We provide professional floating floor installation with multiple material choices including hardwood, laminate, and tile to suit your specific needs and budget.
As a licensed flooring contractor serving the Kansas City area since 2005, we've built our reputation on delivering exceptional results for every client. Our team of skilled installers brings years of experience to each project, ensuring your new floating floors are installed correctly the first time. You'll appreciate how floating floors can reduce noise, provide better insulation, and are often quicker to install than traditional flooring options.
When you choose Kansas City Flooring Company for your floating floor needs, you're partnering with professionals who understand the unique challenges of Kansas City homes. We offer free consultations to help you select the perfect flooring materials for your space. Give us a call today at 913-298-8545 to schedule your appointment and discover why so many of your neighbors trust us with their flooring projects. Our competitive pricing and attention to detail make us the smart choice for your next home improvement project.
Types of Floating Floors

Laminate Floating Floors
This type offers exceptional durability and realistic wood appearances at budget friendly prices. These consist of a fiberboard core with a photographic layer protected by a wear layer.
Engineered Hardwood
This type of flooring gives you the beauty of real wood with enhanced stability. Its layered construction resists the warping that affects solid hardwood.
Luxury Vinyl Plank
LVP provides outstanding water resistance, making it perfect for bathrooms, kitchens, and basements. Many of our customers appreciate its soft feel underfoot and remarkable durability.
Floating Cork Flooring
It delivers natural warmth, sound insulation, and joint comfort. It's an eco-friendly option that's gaining popularity.
The Floating Floor Installation Process
We take several steps before installation day to ensure your new floors will look beautiful and last for years to come.

1. Room Measurement and Material Calculation
We start by taking precise measurements of your space. Our team uses professional tools to measure the exact square footage of each room, including closets and other areas that need flooring.
We calculate the total material needed with a 5-10% waste factor. This extra amount accounts for cuts, pattern matching, and any unexpected issues during installation.
For oddly-shaped rooms, we create detailed diagrams to ensure accurate calculations. We'll also measure doorways and transitions to plan for threshold pieces or reducers.
Having the right amount of materials prevents delays during installation. We'll provide you with a detailed breakdown of all materials needed for your project.
2. Acclimation of Floor Planks
We always acclimate your flooring materials before installation. This critical step allows the planks to adjust to your home's normal temperature and humidity conditions.
Your flooring will be delivered to your home 3-7 days before installation. We'll stack the boxes flat in the installation area, away from exterior walls, windows, and HVAC vents.
The room temperature should remain between 65-75°F with humidity levels of 30-50% during acclimation and for several days after installation. This prevents expansion or contraction issues later.
For engineered and laminate floors, 48 hours of acclimation is typically sufficient. Solid hardwood might require 3-5 days depending on your local climate conditions. We'll monitor the moisture content of the planks to determine when they're ready for installation.
3. Step-by-Step Floor Plank Installation
Before any planks are laid, we prepare your subfloor thoroughly. This includes cleaning, leveling, and ensuring the surface is completely dry. Moisture testing is a critical first step we never skip.
We begin the installation from one corner of the room, typically working from left to right. The first row is crucial for a straight installation. We carefully measure and cut the starter planks to ensure proper alignment with your walls.
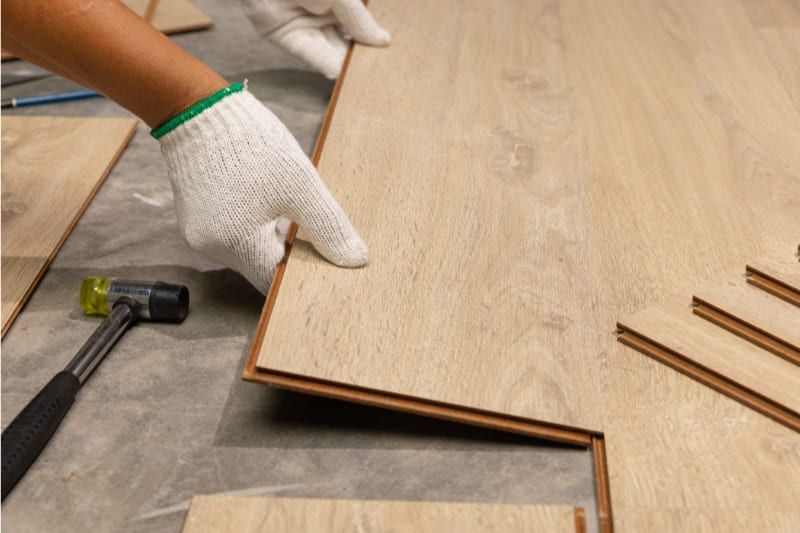
Each plank is positioned with precision against the previous one. We use specialized tools to ensure tight connections between planks while maintaining proper spacing. Our team takes extra care around obstacles like vents, doorways, and cabinets.
We always allow the flooring material to acclimate to your home's environment for 24-48 hours before installation. This prevents future warping or gapping issues.
4. Ensuring Proper Expansion Gaps
Expansion gaps are crucial for floating floor longevity. We maintain a consistent 1/4" to 3/8" gap around the perimeter of your room.
These gaps allow your floor to naturally expand and contract with temperature and humidity changes. Without proper gaps, your beautiful new floor could buckle or warp over time.
We use specialized spacers to maintain uniform gaps during installation. These temporary tools are removed once the installation is complete.
For larger spaces, we incorporate expansion joints every 20-30 feet in both length and width directions. This is especially important in open floor plans or when the flooring continues between multiple rooms.
Our technicians are trained to hide these gaps tastefully with molding and trim work. You'll get the technical benefits without compromising on aesthetics.
5. Finishing Touches on Edges and Molding
The final details make all the difference in a professional installation. We install coordinating transition strips between different flooring types for a seamless look.
Quarter round or baseboard molding covers the expansion gaps while adding a polished finish to your room. We can either install new molding or carefully remove and reinstall your existing trim.
For doorways, we install threshold transitions that accommodate different floor heights while providing a clean transition. Special attention is given to areas around fireplaces, cabinets, and built-ins.
Our team cleans up thoroughly after installation. We remove all spacers, debris, and excess materials.
Before considering the job complete, we conduct a final walkthrough with you to ensure your complete satisfaction with every detail of the installation.
6. Maintaining and Cleaning Your New Floor
We recommend daily sweeping or vacuuming with a soft brush attachment to remove dirt and grit that can scratch your floating floor. Avoid vacuum beater bars which can damage the surface.
Damp mopping should be done weekly using manufacturer-approved cleaning solutions. Never use harsh chemicals, oil soaps, or wax-based products on your floor.
Important: Always wipe up spills immediately. Standing water can seep between planks and cause swelling or warping.
Place felt pads under furniture legs and use protective mats in high-traffic areas. When moving heavy items, lift rather than drag them across the floor.
Maintain ideal indoor humidity levels (30-50%) to prevent gaps between planks. In dry seasons, consider using a humidifier to stabilize floor conditions.
7. Dealing with Scratches and Impacts
Minor scratches on floating floors can often be addressed with touch-up kits that we provide after installation. These kits match your floor color and help conceal small blemishes.
For deeper scratches, we recommend floor gap fillers specifically designed for your flooring type. These products restore the appearance of damaged areas without requiring plank replacement.
Serious impacts might cause planks to chip or crack. In these cases, we can replace individual damaged planks without disturbing the entire floor—a key advantage of floating floor systems.
To prevent future damage, trim pet nails regularly and use furniture pads. Consider using area rugs in spaces where children play with toys that might dent or scratch the floor.
Remember that some wear is natural over time. We can provide refresher treatments that restore shine and protection to your floor's finish every few years.

Is DIY Floating Floor Installation Right for You?
DIY floating floor installation can be a rewarding project for homeowners with basic handyman skills. You should consider your experience level, available time, and physical abilities before deciding to install your own floating floor.
Many floating floor systems are designed to be DIY friendly with click-lock mechanisms that don't require adhesives. However, the process still requires patience and attention to detail.
Consider the size and complexity of your space. Simple rectangular rooms are easier to handle than areas with many doorways, closets, or irregular shapes.
We recommend DIY installation only if you can dedicate 1-2 full days for a standard room. Remember that rushing the job often leads to mistakes that are costly to fix later.

Common DIY Mistakes and How to Avoid Them
Not acclimating materials is a major mistake. Always let your flooring sit in the installation space for 48-72 hours before installation to adjust to temperature and humidity.
Improper underlayment padding can ruin your floating floor's performance. Choose the right underlayment for your specific flooring type and subfloor conditions.
Inadequate expansion gaps are another common error. Floating floors need space to expand and contract with temperature changes. Leave a ¼-inch gap around the perimeter of the room.
Incorrectly staggered seams weaken your floor's structure. Joints between boards should be at least 6 inches apart from row to row.
Poor subfloor preparation leads to uneven floors. Take time to clean thoroughly and fix any squeaks, dips, or bumps in your subfloor before installation.
Flooring Options for Different Environments
Residential spaces have different needs than commercial areas. For high-traffic zones in your home like entryways and kitchens, we recommend our waterproof luxury vinyl plank options with wear layers of at least 20 mil thickness. Commercial spaces need even more durability. Our commercial-grade LVP features 28+ mil wear layers and commercial warranties of 15+ years. Moisture-prone areas like basements or bathrooms need special attention. We offer 100% waterproof options that won't swell or warp when exposed to moisture. These include:
- Waterproof vinyl plank with rigid core technology
- Porcelain tile with floating installation systems
- Specially treated engineered hardwood with waterproof core
For sunrooms or areas with large windows, we suggest UV-resistant products that won't fade or discolor over time.
Still have a question?
Call us now at (816) 555-0123 or fill out our simple contact form on our website. We'll respond within 24 hours to discuss your specific requirements.
